


Background
One afternoon, many weeks ago when I tried to exit a parking lot, I was — once again — battling with technology as I tried to pay the parking fee. I opened an app and used it to scan the QR payment code on the wall, but it just wouldn't recognize the code because it was too far away. Thankfully, a parking lot attendant came out to help me complete the payment, sparing me from the embarrassment of the cars behind me beeping their horns in frustration. This made me want to create a QR code scanning app that could save me from such future pain.
The first demo app I created was, truth to be told, a failure. First, the distance between my phone and a QR code had to be within 30 cm, otherwise the app would fail to recognize the code. However, in most cases, this distance is not ideal for a parking lot.
Another problem was that the app could not recognize a hard-to-read QR code. As no one in a parking lot is responsible for managing QR codes, the codes will gradually wear out and become damaged. Moreover, poor lighting also affects the camera's ability to recognize the QR code.
Third, the app could not recognize the correct QR code when it was displayed alongside other codes. Although this type of situation in a parking lot is rare to come by, I still don't want to take the risk.
And lastly, the app could not recognize a tilted or distorted QR code. Scanning a code face on has a high accuracy rate, but we cannot expect this to be possible every time we exit a parking lot. On top of that, even when we can scan a code face on, chances are there is something obstructing the view, such as a pillar for example. In this case, the code becomes distorted and therefore cannot be recognized by the app.
Solution I Found
Now that I had identified the challenges, I now had to find a QR code scanning solution. Luckily, I came across Scan Kit from HMS Core, which was able to address every problem that my first demo app encountered.
Specifically speaking, the kit has a pre-identification function in its scanning process, which allows it to automatically zoom in on a code from far away. The kit adopts multiple computer vision technologies so that it can recognize a QR code that is unclear or incomplete. For scenarios when there are multiple codes, the kit offers a mode that can simultaneously recognize 5 codes of varying formats. On top of these, the kit can automatically detect and adjust a QR code that is inclined or distorted, so that it can be recognized more quickly.
Development Procedure
Preparations
i. Download and install Android Studio.
ii. Add a Maven repository to the project-level build.gradle file.
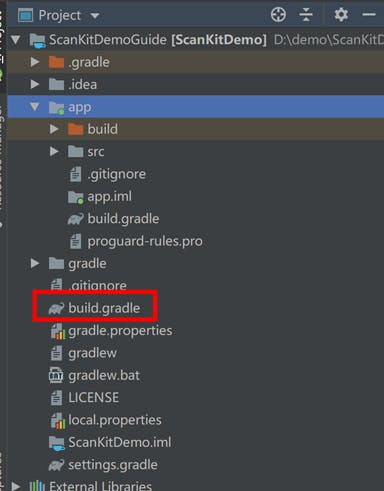
Add the following Maven repository addresses:
buildscript {
    repositories {
        maven {url 'http://developer.huawei.com/repo/'}
    }
}
allprojects {
    repositories {
        maven { url 'http://developer.huawei.com/repo/'}
    }
}
iii. Add build dependencies on the Scan SDK in the app-level build.gradle file.
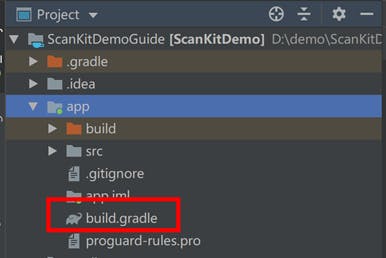
The Scan SDK comes in two versions: Scan SDK-Plus and Scan SDK. The former performs better but it is a little bigger (about 3.1 MB, and the size of the Scan SDK is about 1.1 MB). For my demo app, I chose the plus version:
dependencies{
  implementation 'com.huawei.hms:scanplus:1.1.1.301'
 }
Note that the version number is of the latest SDK.
iv. Configure obfuscation scripts.
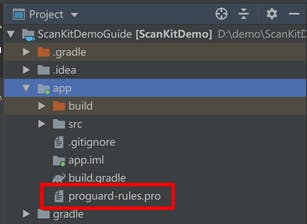
Open this file in the app directory and then add configurations to exclude the HMS Core SDK from obfuscation.
-ignorewarnings
-keepattributes *Annotation*
-keepattributes Exceptions
-keepattributes InnerClasses
-keepattributes Signature
-keepattributes SourceFile,LineNumberTable
-keep class com.hianalytics.android.**{*;}
-keep class com.huawei.**{*;}
v. Declare necessary permissions.
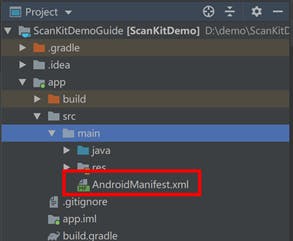
Open the AndroidManifest.xml file. Apply for static permissions and features.
<!-- Camera permission -->
<uses-permission android:name="android.permission.CAMERA" />
<!-- File read permission -->
<uses-permission android:name="android.permission.READ_EXTERNAL_STORAGE" />
<!-- Feature -->
<uses-feature android:name="android.hardware.camera" />
<uses-feature android:name="android.hardware.camera.autofocus" />
Add the declaration on the scanning activity to the application tag.
<!-- Declaration on the scanning activity -->
<activity android:name="com.huawei.hms.hmsscankit.ScanKitActivity" />
Code Development
i. Apply for dynamic permissions when the scanning activity is started.
public void loadScanKitBtnClick(View view) {
    requestPermission(CAMERA_REQ_CODE, DECODE);
}

private void requestPermission(int requestCode, int mode) {
    ActivityCompat.requestPermissions(
            this,
            new String[]{Manifest.permission.CAMERA, Manifest.permission.READ_EXTERNAL_STORAGE},
            requestCode);
}
ii. Start the scanning activity in the permission application callback.
In the code below, setHmsScanTypes specifies QR code as the code format. If you need your app to support other formats, you can use this method to specify them.
@Override
public void onRequestPermissionsResult(int requestCode, String[] permissions, int[] grantResults) {
    if (permissions == null || grantResults == null) {
        return;
    }
    if (grantResults.length < 2 || grantResults[0] != PackageManager.PERMISSION_GRANTED || grantResults[1] != PackageManager.PERMISSION_GRANTED) {
        return;
    }
    if (requestCode == CAMERA_REQ_CODE) {
        ScanUtil.startScan(this, REQUEST_CODE_SCAN_ONE, new HmsScanAnalyzerOptions.Creator().setHmsScanTypes(HmsScan.QRCODE_SCAN_TYPE).create());
    }
}
iii. Obtain the code scanning result in the activity callback.
@Override
protected void onActivityResult(int requestCode, int resultCode, Intent data) {
   super.onActivityResult(requestCode, resultCode, data);
   if (resultCode != RESULT_OK || data == null) {
       return;
   }
   if (requestCode == REQUEST_CODE_SCAN_ONE) {
       HmsScan obj = data.getParcelableExtra(ScanUtil.RESULT);
       if (obj != null) {
           this.textView.setText(obj.originalValue);
       }
   }
}
And just like that, the demo is created. Actually, Scan Kit offers four modes: Default View mode, Customized View mode, Bitmap mode, and MultiProcessor mode, of which the first two are very similar. Their similarity means that Scan Kit controls the camera to implement capabilities such as zoom control and auto focus. The only difference is that Customized View supports customization of the scanning UI. For those who want to customize the scanning process and control the camera, the Bitmap mode is a better choice. The MultiProcessor mode, on the other hand, lets your app scan multiple codes simultaneously. I believe one of them can meet your requirements for developing a code scanner.
Takeaway
Scan-to-pay is a convenient function in parking lots, but may fail when, for example, the distance between a code and phone is too far, the QR code is blurred or incomplete, or the code is scanned at an angle.
HMS Core Scan Kit is a great tool for helping alleviate these issues. What's more, to cater to different scanning requirements, the kit offers four modes that can be used to call its services (Default View mode, Customized View mode, Bitmap mode, and MultiProcessor mode) as well as two SDK versions (Scan SDK-Plus and Scan SDK). All of them can be integrated with just a few lines of code, making integration straightforward, which makes the kit ideal for developing a code scanner that can deliver an outstanding and personalized user experience.