


Why We Need DDGI
Of all the things that make a 3D game immersive, global illumination effects (including reflections, refractions, and shadows) are undoubtedly the jewel in the crown. Simply put, bad lighting can ruin an otherwise great game experience.
A technique for creating real-life lighting is known as dynamic diffuse global illumination (DDGI for short). This technique delivers real-time rendering for games, decorating game scenes with delicate and appealing visuals. In other words, DDGI brings out every color in a scene by dynamically changing the lighting, realizing the distinct relationship between objects and scene temperature, as well as enriching levels of representation for information in a scene.
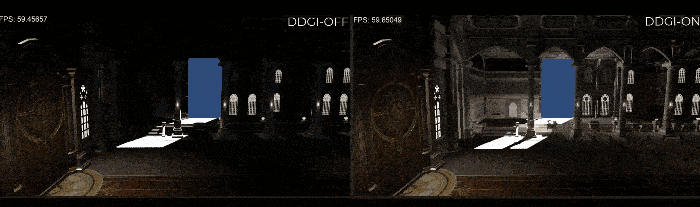 Scene rendered with direct lighting vs. scene rendered with DDGI
Implementing a scene with lighting effects like those in the image on the right requires significant technical power — And this is not the only challenge. Different materials react in different ways to light. Such differences are represented via diffuse reflection that equally scatters lighting information including illuminance, light movement direction, and light movement speed. Skillfully handling all these variables requires a high-performing development platform with massive computing power.
Luckily, the DDGI plugin from HMS Core Scene Kit is an ideal solution to all these challenges, which supports mobile apps, and can be extended to all operating systems, with no need for pre-baking. Utilizing the light probe, the plugin adopts an improved algorithm when updating and coloring probes. In this way, the computing loads of the plugin are lower than those of a traditional DDGI solution. The plugin simulates multiple reflections of light against object surfaces, to bolster a mobile app with dynamic, interactive, and realistic lighting effects.
The fabulous lighting effects found in the scene are created using the plugin just mentioned, which — and I'm not lying — takes merely several simple steps to do. Then let's dive into the steps to know how to equip an app with this plugin.
Development Procedure
Overview
i. Initialization phase: Configure a Vulkan environment and initialize the DDGIAPI class.
ii. Preparation phase:
Create two textures that will store the rendering results of the DDGI plugin, and pass the texture information to the plugin.
Prepare the information needed and then pass it on to the plugin. Such information includes data of the mesh, material, light source, camera, and resolution.
Set necessary parameters for the plugin.
iii. Rendering phase:
When the information about the transformation matrix applied to a mesh, light source, or camera changes, the new information will be passed to the DDGI plugin.
Call the Render() function to perform rendering and save the rendering results of the DDGI plugin to the textures created in the preparation phase.
Apply the rendering results of the DDGI plugin to shading calculations.
Art Restrictions
i. When using the DDGI plugin for a scene, set origin in step 6 in the Procedure part below to the center coordinates of the scene, and configure the count of probes and ray marching accordingly. This helps ensure that the volume of the plugin can cover the whole scene.
ii. To enable the DDGI plugin to simulate light obstruction in a scene, ensure walls in the scene all have a proper level of thickness (which should be greater than the probe density). Otherwise, the light leaking issue will arise. On top of this, I recommend that you create a wall consisting of two single-sided planes.
iii. The DDGI plugin is specifically designed for mobile apps. Taking performance and power consumption into consideration, it is recommended (not required) that:
The vertex count of meshes passed to the DDGI plugin be less than or equal to 50,000, so as to control the count of meshes. For example, pass only the main structures that will create indirect light.
The density and count of probes be up to 10 x 10 x 10.
Procedure
i. Download the package of the DDGI plugin and decompress the package. One header file and two SO files for Android will be obtained. You can find the package here.
ii. Use CMake to create a CMakeLists.txt file. The following is an example of the file.
cmake_minimum_required(VERSION 3.4.1 FATAL_ERROR)
set(NAME DDGIExample)
project(${NAME})

set(PROJ_ROOT ${CMAKE_CURRENT_SOURCE_DIR})
set(CMAKE_CXX_FLAGS "${CMAKE_CXX_FLAGS} -std=c++14 -O2 -DNDEBUG -DVK_USE_PLATFORM_ANDROID_KHR")
file(GLOB EXAMPLE_SRC "${PROJ_ROOT}/src/*.cpp") # Write the code for calling the DDGI plugin by yourself.
include_directories(${PROJ_ROOT}/include) # Import the header file. That is, put the DDGIAPI.h header file in this directory.

# Import two SO files (librtcore.so and libddgi.so).
ADD_LIBRARY(rtcore SHARED IMPORTED)
SET_TARGET_PROPERTIES(rtcore
                PROPERTIES IMPORTED_LOCATION
                ${CMAKE_SOURCE_DIR}/src/main/libs/librtcore.so)

ADD_LIBRARY(ddgi SHARED IMPORTED)
SET_TARGET_PROPERTIES(ddgi
                PROPERTIES IMPORTED_LOCATION
                ${CMAKE_SOURCE_DIR}/src/main/libs/libddgi.so)

add_library(native-lib SHARED ${EXAMPLE_SRC})
target_link_libraries(
    native-lib
    ...
    ddgi # Link the two SO files to the app.
    rtcore
    android
    log
    z
    ...
)
iii. Configure a Vulkan environment and initialize the DDGIAPI class.
// Set the Vulkan environment information required by the DDGI plugin,
// including logicalDevice, queue, and queueFamilyIndex.
void DDGIExample::SetupDDGIDeviceInfo()
{
    m_ddgiDeviceInfo.physicalDevice = physicalDevice;
    m_ddgiDeviceInfo.logicalDevice = device;
    m_ddgiDeviceInfo.queue = queue;
    m_ddgiDeviceInfo.queueFamilyIndex = vulkanDevice->queueFamilyIndices.graphics;
}

void DDGIExample::PrepareDDGI()
{
    // Set the Vulkan environment information.
    SetupDDGIDeviceInfo();
    // Call the initialization function of the DDGI plugin.
    m_ddgiRender->InitDDGI(m_ddgiDeviceInfo);
    ...
}

void DDGIExample::Prepare()
{
    ...
    // Create a DDGIAPI object.
    std::unique_ptr<DDGIAPI> m_ddgiRender = make_unique<DDGIAPI>();
    ...
    PrepareDDGI();
    ...
}
iv. Create two textures: one for storing the irradiance results (that is, diffuse global illumination from the camera view) and the other for storing the normal and depth. To improve the rendering performance, you can set a lower resolution for the two textures. A lower resolution brings a better rendering performance, but also causes distorted rendering results such as sawtooth edges.
// Create two textures for storing the rendering results.
void DDGIExample::CreateDDGITexture()
{
    VkImageUsageFlags usage = VK_IMAGE_USAGE_COLOR_ATTACHMENT_BIT | VK_IMAGE_USAGE_SAMPLED_BIT;
    int ddgiTexWidth = width / m_shadingPara.ddgiDownSizeScale; // Texture width.
    int ddgiTexHeight = height / m_shadingPara.ddgiDownSizeScale; // Texture height.
    glm::ivec2 size(ddgiTexWidth, ddgiTexHeight);
    // Create a texture for storing the irradiance results.
    m_irradianceTex.CreateAttachment(vulkanDevice,
                                     ddgiTexWidth,
                                     ddgiTexHeight,
                                     VK_FORMAT_R16G16B16A16_SFLOAT,
                                     usage,
                                     VK_IMAGE_LAYOUT_SHADER_READ_ONLY_OPTIMAL,
                                     m_defaultSampler);
    // Create a texture for storing the normal and depth.
    m_normalDepthTex.CreateAttachment(vulkanDevice,
                                      ddgiTexWidth,
                                      ddgiTexHeight,
                                      VK_FORMAT_R16G16B16A16_SFLOAT,
                                      usage,
                                      VK_IMAGE_LAYOUT_SHADER_READ_ONLY_OPTIMAL,
                                      m_defaultSampler);
}
// Set the DDGIVulkanImage information.
void DDGIExample::PrepareDDGIOutputTex(const vks::Texture& tex, DDGIVulkanImage *texture) const
{
    texture->image = tex.image;
    texture->format = tex.format;
    texture->type = VK_IMAGE_TYPE_2D;
    texture->extent.width = tex.width;
    texture->extent.height = tex.height;
    texture->extent.depth = 1;
    texture->usage = tex.usage;
    texture->layout = tex.imageLayout;
    texture->layers = 1;
    texture->mipCount = 1;
    texture->samples = VK_SAMPLE_COUNT_1_BIT;
    texture->tiling = VK_IMAGE_TILING_OPTIMAL;
}

void DDGIExample::PrepareDDGI()
{
    ...
    // Set the texture resolution.
    m_ddgiRender->SetResolution(width / m_downScale, height / m_downScale);
    // Set the DDGIVulkanImage information, which tells your app how and where to store the rendering results.
    PrepareDDGIOutputTex(m_irradianceTex, &m_ddgiIrradianceTex);
    PrepareDDGIOutputTex(m_normalDepthTex, &m_ddgiNormalDepthTex);
    m_ddgiRender->SetAdditionalTexHandler(m_ddgiIrradianceTex, AttachmentTextureType::DDGI_IRRADIANCE);
    m_ddgiRender->SetAdditionalTexHandler(m_ddgiNormalDepthTex, AttachmentTextureType::DDGI_NORMAL_DEPTH);
    ...
}

void DDGIExample::Prepare()
{
    ...
    CreateDDGITexture();
    ...
    PrepareDDGI();
    ...
}
v. Prepare the mesh, material, light source, and camera information required by the DDGI plugin to perform rendering.
// Mesh structure, which supports submeshes.
struct DDGIMesh {
    std::string meshName;
    std::vector<DDGIVertex> meshVertex;
    std::vector<uint32_t> meshIndice;
    std::vector<DDGIMaterial> materials;
    std::vector<uint32_t> subMeshStartIndexes;
    ...
};

// Directional light structure. Currently, only one directional light is supported.
struct DDGIDirectionalLight {
    CoordSystem coordSystem = CoordSystem::RIGHT_HANDED;
    int lightId;
    DDGI::Mat4f localToWorld;
    DDGI::Vec4f color;
    DDGI::Vec4f dirAndIntensity;
};

// Main camera structure.
struct DDGICamera {
    DDGI::Vec4f pos;
    DDGI::Vec4f rotation;
    DDGI::Mat4f viewMat;
    DDGI::Mat4f perspectiveMat;
};

// Set the light source information for the DDGI plugin.
void DDGIExample::SetupDDGILights()
{
    m_ddgiDirLight.color = VecInterface(m_dirLight.color);
    m_ddgiDirLight.dirAndIntensity = VecInterface(m_dirLight.dirAndPower);
    m_ddgiDirLight.localToWorld = MatInterface(inverse(m_dirLight.worldToLocal));
    m_ddgiDirLight.lightId = 0;
}

// Set the camera information for the DDGI plugin.
void DDGIExample::SetupDDGICamera()
{
    m_ddgiCamera.pos = VecInterface(m_camera.viewPos);
    m_ddgiCamera.rotation = VecInterface(m_camera.rotation, 1.0);
    m_ddgiCamera.viewMat = MatInterface(m_camera.matrices.view);
    glm::mat4 yFlip = glm::mat4(1.0f);
    yFlip[1][1] = -1;
    m_ddgiCamera.perspectiveMat = MatInterface(m_camera.matrices.perspective * yFlip);
}

// Prepare the mesh information required by the DDGI plugin.
// The following is an example of a scene in glTF format.
void DDGIExample::PrepareDDGIMeshes()
{
    for (constauto& node : m_models.scene.linearNodes) {
        DDGIMesh tmpMesh;
        tmpMesh.meshName = node->name;
        if (node->mesh) {
            tmpMesh.meshName = node->mesh->name; // Mesh name.
            tmpMesh.localToWorld = MatInterface(node->getMatrix()); // Transformation matrix of the mesh.
            // Skeletal skinning matrix of the mesh.
            if (node->skin) {
                tmpMesh.hasAnimation = true;
                for (auto& matrix : node->skin->inverseBindMatrices) {
                    tmpMesh.boneTransforms.emplace_back(MatInterface(matrix));
                }
            }
            // Material node information and vertex buffer of the mesh.
            for (vkglTF::Primitive *primitive : node->mesh->primitives) {
                ...
            }
        }
        m_ddgiMeshes.emplace(std::make_pair(node->index, tmpMesh));
    }
}

void DDGIExample::PrepareDDGI()
{
    ...
    // Convert these settings into the format required by the DDGI plugin.
    SetupDDGILights();
    SetupDDGICamera();
    PrepareDDGIMeshes();
    ...
    // Pass the settings to the DDGI plugin.
    m_ddgiRender->SetMeshs(m_ddgiMeshes);
    m_ddgiRender->UpdateDirectionalLight(m_ddgiDirLight);
    m_ddgiRender->UpdateCamera(m_ddgiCamera);
    ...
}
vi. Set parameters such as the position and quantity of DDGI probes.
// Set the DDGI algorithm parameters.
void DDGIExample::SetupDDGIParameters()
{
    m_ddgiSettings.origin = VecInterface(3.5f, 1.5f, 4.25f, 0.f);
    m_ddgiSettings.probeStep = VecInterface(1.3f, 0.55f, 1.5f, 0.f);
    ...
}
void DDGIExample::PrepareDDGI()
{
    ...
    SetupDDGIParameters();
    ...
    // Pass the settings to the DDGI plugin.
    m_ddgiRender->UpdateDDGIProbes(m_ddgiSettings);
    ...
}
vii. Call the Prepare() function of the DDGI plugin to parse the received data.
void DDGIExample::PrepareDDGI()
{
    ...
    m_ddgiRender->Prepare();
}
viii. Call the Render() function of the DDGI plugin to cache the diffuse global illumination updates to the textures created in step iv.
Notes:
In this version, the rendering results are two textures: one for storing the irradiance results and the other for storing the normal and depth. Then, you can use the bilateral filter algorithm and the texture that stores the normal and depth to perform upsampling for the texture that stores the irradiance results and obtain the final diffuse global illumination results through certain calculations.
If the Render() function is not called, the rendering results are for the scene before the changes happen.
#define RENDER_EVERY_NUM_FRAME 2
void DDGIExample::Draw()
{
    ...
    // Call DDGIRender() once every two frames.
    if (m_ddgiON && m_frameCnt % RENDER_EVERY_NUM_FRAME == 0) {
        m_ddgiRender->UpdateDirectionalLight(m_ddgiDirLight); // Update the light source information.
        m_ddgiRender->UpdateCamera(m_ddgiCamera); // Update the camera information.
        m_ddgiRender->DDGIRender(); // Use the DDGI plugin to perform rendering once and save the rendering results to the textures created in step 4.
    }
    ...
}

void DDGIExample::Render()
{
    if (!prepared) {
        return;
    }
    SetupDDGICamera();
    if (!paused || m_camera.updated) {
        UpdateUniformBuffers();
    }
    Draw();
    m_frameCnt++;
}
ix. Apply the global illumination (also called indirect illumination) effects of the DDGI plugin as follows.
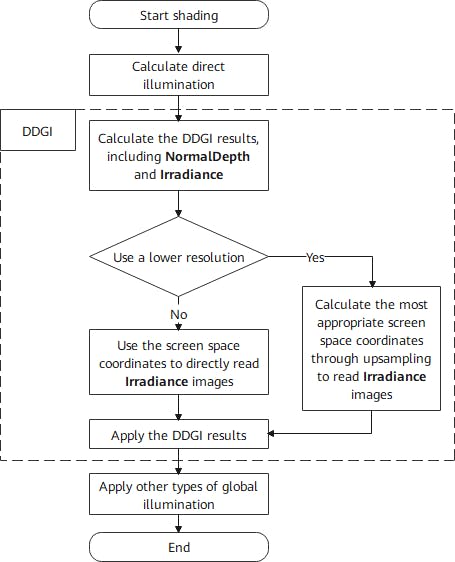
// Apply the rendering results of the DDGI plugin to shading calculations.

// Perform upsampling to calculate the DDGI results based on the screen space coordinates.
vec3 Bilateral(ivec2 uv, vec3 normal)
{
    ...
}

void main()
{
    ...
    vec3 result = vec3(0.0);
    result += DirectLighting();
    result += IndirectLighting();
    vec3 DDGIIrradiances = vec3(0.0);
    ivec2 texUV = ivec2(gl_FragCoord.xy);
    texUV.y = shadingPara.ddgiTexHeight - texUV.y;
    if (shadingPara.ddgiDownSizeScale == 1) { // Use the original resolution.
        DDGIIrradiances = texelFetch(irradianceTex, texUV, 0).xyz;
    } else { // Use a lower resolution.
        ivec2 inDirectUV = ivec2(vec2(texUV) / vec2(shadingPara.ddgiDownSizeScale));
        DDGIIrradiances = Bilateral(inDirectUV, N);
    }
    result += DDGILighting();
    ...
    Image = vec4(result_t, 1.0);
}
Now the DDGI plugin is integrated, and the app can unleash dynamic lighting effects.
Takeaway
DDGI is a technology widely adopted in 3D games to make games feel more immersive and real, by delivering dynamic lighting effects. However, traditional DDGI solutions are demanding, and it is challenging to integrate one into a mobile app.
Scene Kit breaks down these barriers, by introducing its DDGI plugin. The high performance and easy integration of this DDGI plugin is ideal for developers who want to create realistic lighting in apps.