


Audio is the soul of media, and for mobile apps in particular, it engages with users more, adds another level of immersion, and enriches content.
This is a major driver of my obsession for developing audio-related functions. In my recent post that tells how I developed a portrait retouching function for a live-streaming app, I mentioned that I wanted to create a solution that can retouch music. I know that a technology called spatial audio can help with this, and — guess what — I found a synonymous capability in HMS Core Audio Editor Kit, which can be integrated independently, or used together with other capabilities in the UI SDK of this kit.
I chose to integrate the UI SDK into my demo first, which is loaded with not only the kit's capabilities, but also a ready-to-use UI. This allows me to give the spatial audio capability a try and frees me from designing the UI. Now let's dive into the development procedure of the demo.
Development Procedure
Preparations
i. Prepare the development environment, which has requirements on both software and hardware. These are:
Software requirements:
JDK version: 1.8 or later
Android Studio version: 3.X or later
minSdkVersion: 24 or later
targetSdkVersion: 33 (recommended)
compileSdkVersion: 30 (recommended)
Gradle version: 4.6 or later (recommended)
Hardware requirements: a phone running EMUI 5.0 or later, or a phone running Android whose version ranges from Android 7.0 to Android 13.
ii. Configure app information in a platform called AppGallery Connect, and go through the process of registering as a developer, creating an app, generating a signing certificate fingerprint, configuring the signing certificate fingerprint, enabling the kit, and managing the default data processing location.
iii. Integrate the HMS Core SDK.
iv. Add necessary permissions in the AndroidManifest.xml file, including the vibration permission, microphone permission, storage write permission, storage read permission, Internet permission, network status access permission, and permission to obtaining the changed network connectivity state.
When the app's Android SDK version is 29 or later, add the following attribute to the application element, which is used for obtaining the external storage permission.
<application
        android:requestLegacyExternalStorage="true"
        ……        >
SDK Integration
i. Initialize the UI SDK and set the app authentication information. If the information is not set, this may affect some functions of the SDK.
// Obtain the API key from the agconnect-services.json file.
// It is recommended that the key be stored on cloud, which can be obtained when the app is running.
String api_key = AGConnectInstance.getInstance().getOptions().getString("client/api_key");
// Set the API key.
HAEApplication.getInstance().setApiKey(api_key);
ii. Create AudioFilePickerActivity, which is a customized activity used for audio file selection.
/**
 * Customized activity, used for audio file selection.
 */
public class AudioFilePickerActivity extends AppCompatActivity {

    @Override
    protected void onCreate(@Nullable Bundle savedInstanceState) {
        super.onCreate(savedInstanceState);
        performFileSearch();
    }

    private void performFileSearch() {
        // Select multiple audio files.
        registerForActivityResult(new ActivityResultContracts.GetMultipleContents(), new ActivityResultCallback<List<Uri>>() {
            @Override
            public void onActivityResult(List<Uri> result) {
                handleSelectedAudios(result);
                finish();
            }
        }).launch("audio/*");
    }

    /**
     * Process the selected audio files, turning the URIs into paths as needed.
     *
     * @param uriList indicates the selected audio files.
     */
    private void handleSelectedAudios(List<Uri> uriList) {
        // Check whether the audio files exist.
        if (uriList == null || uriList.size() == 0) {
            return;
        }

        ArrayList<String> audioList = new ArrayList<>();
        for (Uri uri : uriList) {
            // Obtain the real path.
            String filePath = FileUtils.getRealPath(this, uri);
            audioList.add(filePath);
        }

        // Return the audio file path to the audio editing UI.
        Intent intent = new Intent();
        // Use HAEConstant.AUDIO_PATH_LIST that is provided by the SDK.
        intent.putExtra(HAEConstant.AUDIO_PATH_LIST, audioList);
        // Use HAEConstant.RESULT_CODE as the result code.
        this.setResult(HAEConstant.RESULT_CODE, intent);
        finish();
    }
}
The FileUtils utility class is used for obtaining the real path, which is detailed here. Below is the path to this class.
app/src/main/java/com/huawei/hms/audioeditor/demo/util/FileUtils.java
iii. Add the action value to AudioFilePickerActivity in AndroidManifest.xml. The SDK would direct to a screen according to this action.
<activity
    android:name=".AudioFilePickerActivity"
    android:exported="false">
    <intent-filter>
        <action android:name="com.huawei.hms.audioeditor.chooseaudio" />
        <category android:name="android.intent.category.DEFAULT" />
    </intent-filter>
</activity>
iv. Launch the audio editing screen via either:
Mode 1: Launch the screen without input parameters. In this mode, the default configurations of the SDK are used.
HAEUIManager.getInstance().launchEditorActivity(this);
Mode 2: Launch the audio editing screen with input parameters. This mode lets you set the menu list and customize the path for an output file. On top of this, the mode also allows for specifying the input audio file paths, setting the draft mode, and more.
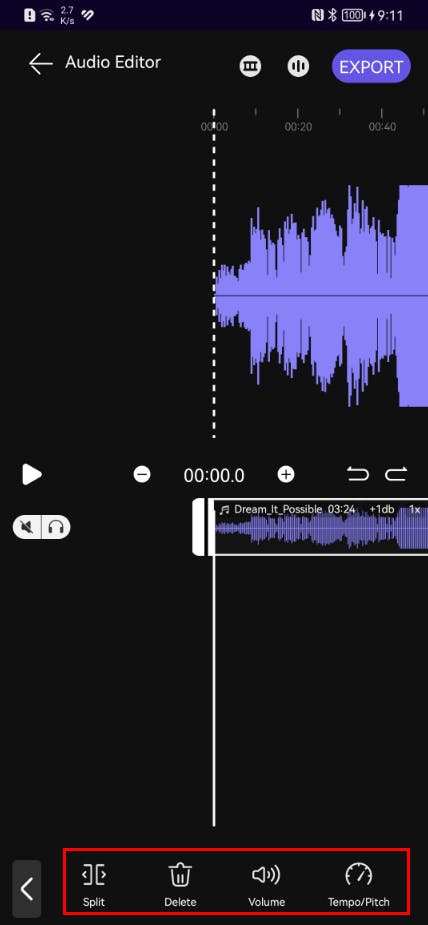
Launch the screen with the menu list and customized output file path:
  // List of level-1 menus. Below are just some examples:
  ArrayList<Integer> menuList = new ArrayList<>();
  // Add audio.
  menuList.add(MenuCommon.MAIN_MENU_ADD_AUDIO_CODE);
  // Record audio.
  menuList.add(MenuCommon.MAIN_MENU_AUDIO_RECORDER_CODE);
  // List of level-2 menus, which are displayed after audio files are input and selected.
  ArrayList<Integer> secondMenuList = new ArrayList<>();
  // Split audio.
  secondMenuList.add(MenuCommon.EDIT_MENU_SPLIT_CODE);
  // Delete audio.
  secondMenuList.add(MenuCommon.EDIT_MENU_DEL_CODE);
  // Adjust the volume.
  secondMenuList.add(MenuCommon.EDIT_MENU_VOLUME2_CODE);
  // Customize the output file path.
  String exportPath = Environment.getExternalStoragePublicDirectory(Environment.DIRECTORY_MUSIC).getPath() + "/";
  AudioEditorLaunchOption.Builder audioEditorLaunch = new AudioEditorLaunchOption.Builder()
          // Set the level-1 menus.
          .setCustomMenuList(menuList)
          // Set the level-2 menus.
          .setSecondMenuList(secondMenuList)
          // Set the output file path.
          .setExportPath(exportPath);
  // Launch the audio editing screen with the menu list and customized output file path.
  try {
      HAEUIManager.getInstance().launchEditorActivity(this, audioEditorLaunch.build(), new LaunchCallback() {
          @Override
          public void onFailed(int errCode, String errMsg) {
              Toast.makeText(mContext, errMsg, Toast.LENGTH_SHORT).show();
          }
      });
  } catch (IOException e) {
      e.printStackTrace();
  }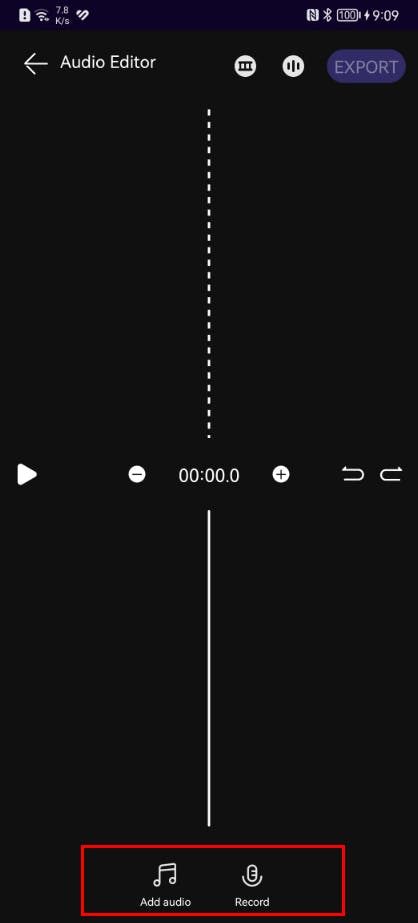
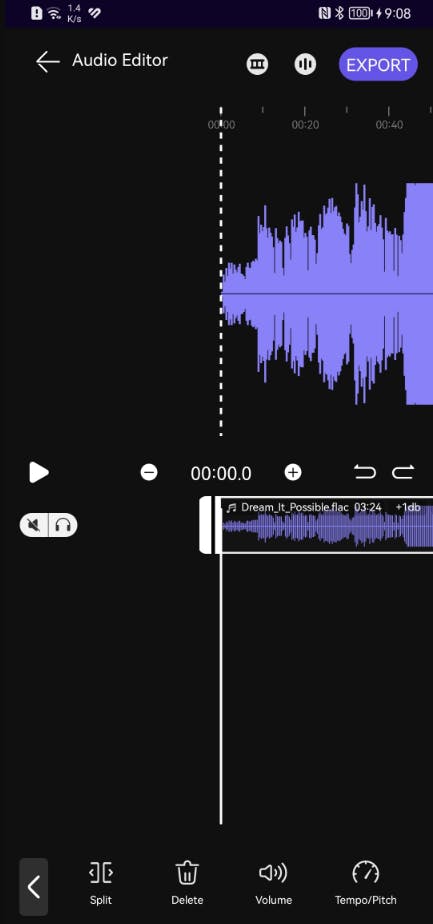
Launch the screen with the specified input audio file paths:
  // Set the input audio file paths.
  ArrayList<AudioInfo> audioInfoList = new ArrayList<>();
  // Example of an audio file path:
  String audioPath = "/storage/emulated/0/Music/Dream_It_Possible.flac";
  // Create an instance of AudioInfo and pass the audio file path.
  AudioInfo audioInfo = new AudioInfo(audioPath);
  // Set the audio name.
  audioInfo.setAudioName("Dream_It_Possible");
  audioInfoList.add(audioInfo);
  AudioEditorLaunchOption.Builder audioEditorLaunch = new AudioEditorLaunchOption.Builder()
          // Set the input audio file paths.
          .setFilePaths(audioInfoList);
  // Launch the audio editing screen with the specified input audio file paths.
  try {
      HAEUIManager.getInstance().launchEditorActivity(this, audioEditorLaunch.build(), new LaunchCallback() {
          @Override
          public void onFailed(int errCode, String errMsg) {
              Toast.makeText(mContext, errMsg, Toast.LENGTH_SHORT).show();
          }
      });
  } catch (IOException e) {
      e.printStackTrace();
  }
In this mode, the audio editing screen directly displays the level-2 menus after the screen is launched.
Launch the screen with drafts:
  // Obtain the draft list. For example:
  List<DraftInfo> draftList = HAEUIManager.getInstance().getDraftList();
  // Specify the first draft in the draft list.
  String draftId = null;
  if (!draftList.isEmpty()) {
      draftId = draftList.get(0).getDraftId();
  }
  AudioEditorLaunchOption.Builder audioEditorLaunch = new AudioEditorLaunchOption.Builder()
          // Set the draft ID, which can be null.
          .setDraftId(draftId)
          // Set the draft mode. NOT_SAVE is the default value, which indicates not to save a project as a draft.
          .setDraftMode(AudioEditorLaunchOption.DraftMode.SAVE_DRAFT);
  // Launch the audio editing screen with drafts.
  try {
      HAEUIManager.getInstance().launchEditorActivity(this, audioEditorLaunch.build(), new LaunchCallback() {
          @Override
          public void onFailed(int errCode, String errMsg) {
              Toast.makeText(mContext, errMsg, Toast.LENGTH_SHORT).show();
          }
      });
  } catch (IOException e) {
      e.printStackTrace();
  }
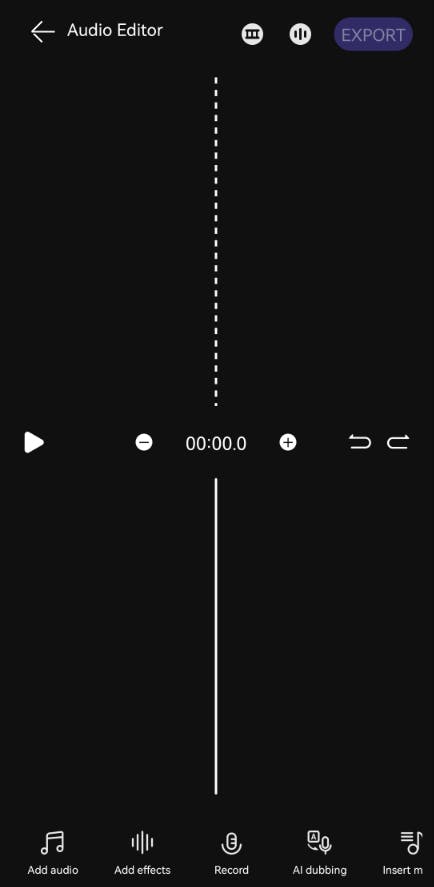
And just like that, SDK integration is complete, and the prototype of the audio editing app I want is ready to use.
Not bad. It has all the necessary functions of an audio editing app, and best of all, it's pretty easy to develop, thanks to the all-in-one and ready-to-use SDK.
Anyway, I tried the spatial audio function preset in the SDK and I found I could effortlessly add more width to a song. However, I also want a customized UI for my app, instead of simply using the one provided by the UI SDK. So my next step is to create a demo with the UI that I have designed and the spatial audio function.
Afterthoughts
Truth to be told, the integration process wasn't as smooth as it seemed. I encountered two issues, but luckily, after doing some of my own research and contacting the kit's technical support team, I was able to fix the issues.
The first issue I came across was that after touching the Add effects and AI dubbing buttons, the UI displayed The token has expired or is invalid, and the Android Studio console printed the HAEApplication: please set your app apiKey log. The reason for this was that the app's authentication information was not configured. There are two ways of configuring this. The first was introduced in the first step of SDK Integration of this post, while the second was to use the app's access token, which had the following code:
HAEApplication.getInstance().setAccessToken("your access token");
The second issue — which is actually another result of unconfigured app authentication information — is the Something went wrong error displayed on the screen after an operation. To solve it, first make sure that the app authentication information is configured. Once this is done, go to AppGallery Connect to check whether Audio Editor Kit has been enabled for the app. If not, enable it. Note that because of caches (of either the mobile phone or server), it may take a while before the kit works for the app.
Also, in the Preparations part, I skipped the step for configuring obfuscation scripts before adding necessary permissions. This step is, according to technical support, necessary for apps that aim to be officially released. The app I have covered in this post is just a demo, so I just skipped this step.
Takeaway
No app would be complete with audio, and with spatial audio, you can deliver an even more immersive audio experience to your users.
Developing a spatial audio function for a mobile app can be a piece of cake thanks to HMS Core Audio Editor Kit. The spatial audio capability can be integrated either independently or together with other capabilities via the UI SDK, which delivers a ready-to-use UI, so that you can skip the tricky bits and focus more on what matters to users.