


Table of contents
Personalized health records and visual tools have been a godsend for digital health management, giving users the tools to conveniently track their health on their mobile phones. From diet to weight and fitness and beyond, storing, managing, and sharing health data has never been easier. Users can track their health over a specific period of time, like a week or a month, to identify potential diseases in a timely manner, and to lead a healthy lifestyle. Moreover, with personalized health records in hand, trips to the doctor now lead to quicker and more accurate diagnoses. Health Kit takes this new paradigm into overdrive, opening up a wealth of capabilities that can endow your health app with nimble, user-friendly features.
With the basic capabilities of Health Kit integrated, your app will be able to obtain users' health data on the cloud from the Huawei Health app, after obtaining users' authorization, and then display the data to users.
Effects
This demo is modified based on the sample code of Health Kit's basic capabilities. You can download the demo and try it out to build your own health app.
Preparations
Registering an Account and Applying for the HUAWEI ID Service
Health Kit uses the HUAWEI ID service and therefore, you need to apply for the HUAWEI ID service first. Skip this step if you have done so for your app.
Applying for the Health Kit Service
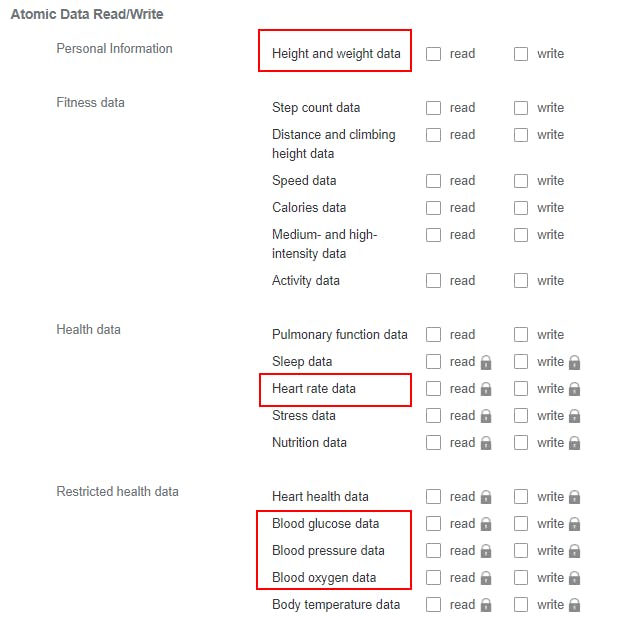
Apply for the data read and write scopes for your app. Find the Health Kit service in the Development section on HUAWEI Developers, and apply for the Health Kit service. Select the data scopes required by your app. In the demo, the height and weight data are applied for, which are unrestricted data and will be quickly approved after your application is submitted. If you want to apply for restricted data scopes such as heart rate, blood pressure, blood glucose, and blood oxygen saturation, your application will be manually reviewed.
Integrating the HMS Core SDK
Before getting started, integrate the Health SDK of the basic capabilities into the development environment.
Use Android Studio to open the project, and find and open the build.gradle file in the root directory of the project. Go to allprojects > repositories and buildscript > repositories to add the Maven repository address for the SDK.
maven {url 'https://developer.huawei.com/repo/'
Open the app-level build.gradle file and add the following build dependency to the dependencies block.
implementation 'com.huawei.hms:health:{version}'
Open the modified build.gradle file again. You will find a Sync Now link in the upper right corner of the page. Click Sync Now and wait until the synchronization is complete.
Configuring the Obfuscation Configuration File
Before building the APK, configure the obfuscation configuration file to prevent the HMS Core SDK from being obfuscated.
Open the obfuscation configuration file proguard-rules.pro in the app's root directory of the project, and add configurations to exclude the HMS Core SDK from obfuscation.
-ignorewarnings
-keepattributes *Annotation*
-keepattributes Exceptions
-keepattributes InnerClasses
-keepattributes Signature
-keepattributes SourceFile,LineNumberTable
-keep class com.huawei.hianalytics.**{*;}
-keep class com.huawei.updatesdk.**{*;}
-keep class com.huawei.hms.**{*;}
Importing the Certificate Fingerprint, Changing the Package Name, and Configuring the JDK Build Version
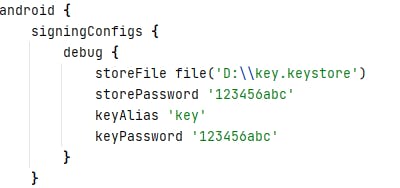
Import the keystore file generated when the app is created. After the import, open the app-level build.gradle file to view the import result.
Change the app package name to the one you set in applying for the HUAWEI ID Service.
Open the app-level build.gradle file and add the compileOptions configuration to the android block as follows:
compileOptions {
    sourceCompatibility = '1.8'
    targetCompatibility = '1.8'
}
Main Implementation Code
i. Start the screen for login and authorization.
/**
 * Add scopes that you are going to apply for and obtain the authorization intent.
 */
private void requestAuth() {
    // Add scopes that you are going to apply for. The following is only an example.
    // You need to add scopes for your app according to your service needs.
    String[] allScopes = Scopes.getAllScopes();
    // Obtain the authorization intent.
    // True indicates that the Huawei Health app authorization process is enabled; False otherwise.
    Intent intent = mSettingController.requestAuthorizationIntent(allScopes, true);

    // The authorization screen is displayed.
    startActivityForResult(intent, REQUEST_AUTH);
}
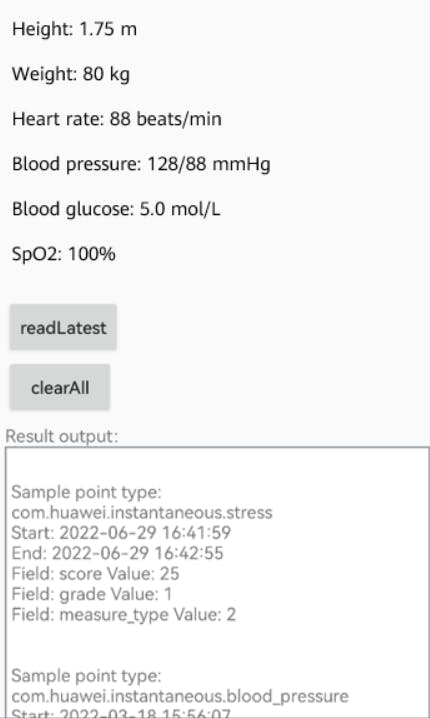
ii. Call com.huawei.hms.hihealth. Then call readLatestData() of the DataController class to read the latest health-related data, including height, weight, heart rate, blood pressure, blood glucose, and blood oxygen.
/**
 * Read the latest data according to the data type.
 *
 * @param view (indicating a UI object)
 */
public void readLatestData(View view) {
    // 1. Call the data controller using the specified data type (DT_INSTANTANEOUS_HEIGHT) to query data.
    // Query the latest data of this data type.
    List<DataType> dataTypes = new ArrayList<>();
    dataTypes.add(DataType.DT_INSTANTANEOUS_HEIGHT);
    dataTypes.add(DataType.DT_INSTANTANEOUS_BODY_WEIGHT);
    dataTypes.add(DataType.DT_INSTANTANEOUS_HEART_RATE);
    dataTypes.add(DataType.DT_INSTANTANEOUS_STRESS);
    dataTypes.add(HealthDataTypes.DT_INSTANTANEOUS_BLOOD_PRESSURE);
    dataTypes.add(HealthDataTypes.DT_INSTANTANEOUS_BLOOD_GLUCOSE);
    dataTypes.add(HealthDataTypes.DT_INSTANTANEOUS_SPO2);
    Task<Map<DataType, SamplePoint>> readLatestDatas = dataController.readLatestData(dataTypes);

    // 2. Calling the data controller to query the latest data is an asynchronous operation.
    // Therefore, a listener needs to be registered to monitor whether the data query is successful or not.
    readLatestDatas.addOnSuccessListener(new OnSuccessListener<Map<DataType, SamplePoint>>() {
        @Override
        public void onSuccess(Map<DataType, SamplePoint> samplePointMap) {
            logger("Success read latest data from HMS core");
            if (samplePointMap != null) {
                for (DataType dataType : dataTypes) {
                    if (samplePointMap.containsKey(dataType)) {
                        showSamplePoint(samplePointMap.get(dataType));
                        handleData(dataType);
                    } else {
                        logger("The DataType " + dataType.getName() + " has no latest data");
                    }
                }
            }
        }
    });
    readLatestDatas.addOnFailureListener(new OnFailureListener() {
        @Override
        public void onFailure(Exception e) {
            String errorCode = e.getMessage();
            String errorMsg = HiHealthStatusCodes.getStatusCodeMessage(Integer.parseInt(errorCode));
            logger(errorCode + ": " + errorMsg);
        }
    });
}
The DataType object contains the specific data type and data value. You can obtain the corresponding data by parsing the object.
Conclusion
Personal health records make it much easier for users to stay informed about their health. The health records help track health data over specific periods of time, such as week-by-week or month-by-month, providing invaluable insight, to make proactive health a day-to-day reality. When developing a health app, integrating data-related capabilities can help streamline the process, allowing you to focus your energy on app design and user features, to bring users a smart handy health assistant.